タグ: CSS

  • The site post list displaying improved by additional coding to the code of “Flex Post” plugin -ID14897 [2020/06/16]

    The site post list displaying improved by additional coding to the code of “Flex Post” plugin -ID14897 [2020/06/16]

    ID14897

    ポストのリスト・プラグインをソースコードで修正

    ページネーション(pagination)

    記事のリストには,「Flex Posts」プラグインを使用しています.軽くて良いプラグインですが,ページネーションが機能しませんが(2020/04/29現在),他のプラグインでも機能しないので,何かのプラグインが悪いか,相性が悪い可能性があります. 2020/06/07, その後、不要なプラグインの削除、Flex Postsの更新などがあったせいか、ページネーションは機能するようになりました。

    Flex Posts plugin

    Layout 1又はList-1の体裁が好みなのですが,featured imageが日本語表示ではバランス的に小さかったり,2カラムの投稿表示であるなど,好みでない部分がありました.

    今回,プラグインのソースコードを一通り確認して,修正する箇所を特定して少しいじりました.CSSで間に合う部分は,CSSに追加しました.

    1ライン(カラム)で1つの記事を表示するようにしました。

    フォントの修正は,CSSに

    /* Twenty Twenty Theme
    Entry header is changed to transparent
    */
    .singular .entry-header, .singular .featured-media:before,  .wp-block-pullquote:before {
        background-color: transparent;
    }
    
    /* FLEX POSTS plugin
     * image size of list-1
     * /plugin/flex-posts/public/css/flex-posts.cssを参照した
     * my customizing 2020/04/26
    */
    .fp-thumbnail img.size-thumbnail {
    width: 150px;
    height: 150px;
    }
    

    プラグインのソースコードの修正

    • コード修正したファイル
      • plugins\flex-posts\public\flex-posts-list-1.php
    • 修正概要は,fp-row, fp-colをClassに追加したり,削除したりして,2カラムになって,1行が短いことを1カラムなるように修正.タイトルフォトをH4からH5に修正
    • プラグインのVersion upがあった際には,修正ファイルと置き換えるか,コードを見ながらNew Versionを修正する

    修正済み(modified coed)

    plugins\flex-posts\public\flex-posts-list-2.php

    2020/06/16

    • フローチャート表示用に改造を開始
    • <center>⬇️</center>を配置
    <?php
    /**
     * Flex posts widget template: List 2
     *
     * @package Flex Posts
     */
    
    if ( ! defined( 'ABSPATH' ) ) {
    	exit;
    }
    
    ?>
    <div class="fp-row fp-list-2 fp-flex">
    
    	<?php while ( $query->have_posts() ) : ?>
    
    		<?php $query->the_post(); ?>
    
    		<div class="fp-col fp-post">
    			<?php flex_posts_thumbnail( $medium_size, $instance, $query->current_post ); ?>
    
    			<div class="fp-body">
    				<?php if ( ! empty( $instance['show_categories'] ) ) : ?>
    					<?php flex_posts_categories_meta(); ?>
    				<?php endif; ?>
    
    				<h4 class="fp-title">
    					<a href="<?php the_permalink(); ?>"><?php the_title(); ?></a>
    					<center>⬇️</center>
    				</h4>
    
    				<div class="fp-meta">
    					<?php flex_posts_meta( $instance ); ?>
    				</div>
    
    				<?php if ( ! empty( $instance['show_excerpt'] ) ) : ?>
    					<div class="fp-excerpt"><?php flex_posts_excerpt( $excerpt_length ); ?></div>
    				<?php endif; ?>
    
    				<?php if ( ! empty( $instance['show_readmore'] ) ) : ?>
    					<div class="fp-readmore">
    						<a href="<?php the_permalink(); ?>" class="fp-readmore-link"><?php echo esc_html( $readmore_text ); ?></a>
    					</div>
    				<?php endif; ?>
    			</div>
    		</div>
    
    	<?php endwhile; ?>
    
    	<div class="fp-col"></div>
    	<div class="fp-col"></div>
    
    </div>
    

    plugins\flex-posts\public\flex-posts-list-1.php

    2020/06/16

    Flex Posts – Widget and Gutenberg Block Version 1.60 to 1.70にupdateして、function flex_post_excerpt()が機能しなくなったため独自に修正とその他微調整。

    • オリジナルのflex_posts_excerpt()を削除し、the_excerpt()を配置
    • 日付metaの位置をthumbnailの上に変更
    <?php
    /**
     * Flex posts widget template: List 1
     *
     * @package Flex Posts
     */
    
    if ( ! defined( 'ABSPATH' ) ) {
    	exit;
    }
    
    ?>
    <div class="fp-list-1 fp-flex">
    
    	<?php while ( $query->have_posts() ) : ?>
    
    		<?php $query->the_post(); ?>
    
    		<div class="fp-post">
    			<div class="fp-meta">
    				<?php flex_posts_meta( $instance ); ?>
    			</div>
    
    			<div class="fp-row fp-flex">
    				<?php flex_posts_thumbnail( $thumbnail_size, $instance, $query->current_post ); ?>
    
    				<div class="fp-body">
    					<?php if ( ! empty( $instance['show_categories'] ) ) : ?>
    						<?php flex_posts_categories_meta(); ?>
    					<?php endif; ?>
    
    					<h5 class="fp-title">
    						<a href="<?php the_permalink(); ?>"><?php the_title(); ?></a>
    					</h5>
    			<?php if ( ! empty( $instance['show_excerpt'] ) ) : ?>
    				<div class="fp-excerpt">
    					<?php 
    						// flex_posts_excerpt($excerpt_length );
    						 the_excerpt(); 
    					?>
    				</div>
    			<?php endif; ?>
    				</div>
    			</div>
    
    			<?php if ( ! empty( $instance['show_readmore'] ) ) : ?>
    				<div class="fp-readmore">
    					<a href="<?php the_permalink(); ?>" class="fp-readmore-link"><?php echo esc_html( $readmore_text ); ?></a>
    				</div>
    			<?php endif; ?>
    		</div>
    
    	<?php endwhile; ?>
    
    	<div class="fp-col"></div>
    	<div class="fp-col"></div>
    
    </div>

    修正済み(modified coed)

    2020/04/29

    <?php
    /**
     * Flex posts widget template: List 1
     *
     * @package Flex Posts
     */
    
    if ( ! defined( 'ABSPATH' ) ) {
    	exit;
    }
    
    ?>
    <div class="fp-list-1 fp-flex">
    
    	<?php while ( $query->have_posts() ) : ?>
    
    		<?php $query->the_post(); ?>
    
    		<div class="fp-post">
    			<div class="fp-row fp-flex">
    				<?php flex_posts_thumbnail( $thumbnail_size, $instance, $query->current_post ); ?>
    
    				<div class="fp-body">
    					<?php if ( ! empty( $instance['show_categories'] ) ) : ?>
    						<?php flex_posts_categories_meta(); ?>
    					<?php endif; ?>
    
    					<h5 class="fp-title">
    						<a href="<?php the_permalink(); ?>"><?php the_title(); ?></a>
    					</h5>
    
    					<div class="fp-meta">
    						<?php flex_posts_meta( $instance ); ?>
    					</div>
    			<?php if ( ! empty( $instance['show_excerpt'] ) ) : ?>
    				<div class="fp-excerpt"><?php flex_posts_excerpt( $excerpt_length ); ?></div>
    			<?php endif; ?>
    				</div>
    			</div>
    
    			<?php if ( ! empty( $instance['show_readmore'] ) ) : ?>
    				<div class="fp-readmore">
    					<a href="<?php the_permalink(); ?>" class="fp-readmore-link"><?php echo esc_html( $readmore_text ); ?></a>
    				</div>
    			<?php endif; ?>
    		</div>
    
    	<?php endwhile; ?>
    
    	<div class="fp-col"></div>
    	<div class="fp-col"></div>
    
    </div>
    

    修正前(before)

    <?php
    /**
     * Flex posts widget template: List 1
     *
     * @package Flex Posts
     */
    
    if ( ! defined( 'ABSPATH' ) ) {
    	exit;
    }
    
    ?>
    <div class="fp-row fp-list-1 fp-flex">
    
    	<?php while ( $query->have_posts() ) : ?>
    
    		<?php $query->the_post(); ?>
    
    		<div class="fp-col fp-post">
    			<div class="fp-flex">
    				<?php flex_posts_thumbnail( $thumbnail_size, $instance, $query->current_post ); ?>
    
    				<div class="fp-body">
    					<?php if ( ! empty( $instance['show_categories'] ) ) : ?>
    						<?php flex_posts_categories_meta(); ?>
    					<?php endif; ?>
    
    					<h4 class="fp-title">
    						<a href="<?php the_permalink(); ?>"><?php the_title(); ?></a>
    					</h4>
    
    					<div class="fp-meta">
    						<?php flex_posts_meta( $instance ); ?>
    					</div>
    				</div>
    			</div>
    
    			<?php if ( ! empty( $instance['show_excerpt'] ) ) : ?>
    				<div class="fp-excerpt"><?php flex_posts_excerpt( $excerpt_length ); ?></div>
    			<?php endif; ?>
    
    			<?php if ( ! empty( $instance['show_readmore'] ) ) : ?>
    				<div class="fp-readmore">
    					<a href="<?php the_permalink(); ?>" class="fp-readmore-link"><?php echo esc_html( $readmore_text ); ?></a>
    				</div>
    			<?php endif; ?>
    		</div>
    
    	<?php endwhile; ?>
    
    	<div class="fp-col"></div>
    	<div class="fp-col"></div>
    
    </div>
    

    編集履歴

    2020/04/29 はりきり(Mr)
    2020/06/07 追記 (ページネーション機能が正常になったこと)
    2020/06/16 追記 (Flex Post Version 1.70でexcerpt非表示への対応、List-2の改造開始)
  • [WordPress] 自作プラグイン、Twenty Twentyテーマ幅の修正、子テーマのcontent.phpをいじる – △ID11199 [2020/03/01]

    [WordPress] 自作プラグイン、Twenty Twentyテーマ幅の修正、子テーマのcontent.phpをいじる – △ID11199 [2020/03/01]

    はじめに

    サイトの表示具合は、設定されているCSSを変更して自分好みに変更したり、自作のプラグインにCSSコードを埋め込んだり、色々と方法があるようです。CSSをいじる場合は、小テーマを作って、それを編集するようにします。子テーマを作る理由は、テーマのアップデートによって上書きされてしまうので、それを避けるためです。私も専門家ではありませんが、これからは、徐々にサイトの表示具合をカスタマイズしていきたいと思っていますが、その手法もいろいろあり、それらを学んで行こうと思います。

    自作プラグイン

    まだ、表示幅の埋め込みしかできていません。当サイトでしようしているTwenty Twentyテーマの投稿のデフォルト幅を、以下の手順で自作プラグインとしてインストールして、広くなるように設定できます。

    • 参考1からWordPressのTwenty Twentyテーマのデフォルトの投稿幅を広くするコードを、参考1のmy-plugin.phpの指定の箇所にコピペする
    • my-plugin.phpは、WordPressのブラインインとしてインストールできるようにパッケージされているので、ダウンロードしたファイルの組合せで、アップロードしてインストールする。
    • 以上の操作で、設定が反映される。

    参考1
    WordPress5.3 新デフォルトテーマ Twenty Twenty をチェックしています

    https://nendeb.com/819

    参考2
    WordPress (自分専用)マイ・プラグインを作ろう

    https://nendeb.com/1

    完成したプラグインのコード

    幅の修正のオリジナルは、functions.phpにグローバル変数として設定されており580px(下の「functions.php」を参照)でしたが、iPad Pro 11で閲覧して違和感のない広さに設定してみました。

    その設定では、860pxになっています。以下のコードのコメントには、オリジナルの値580pxを残していますが、実際の設定コードは860pxに変更しています。

    functions.php

    グローバル変数 $content_width

    	// Set content-width.
    	global $content_width;
    	if ( ! isset( $content_width ) ) {
    		$content_width = 580;
    	}
    

    my-plugin.php

    <?php
    /*
    Plugin Name: my-plugin
    Plugin URI:
    Description: My Plugin For WordPress.
    Version: 1.0.2
    Author: nendeb
    Author URI: http://nendeb.com/
    License: GPLv2 or later
    */
    
    
    // ここからコードをいれてください。
    
    // Start_01,WordPress Theme: Twenty Twenty の表示幅
    /* コンテンツ幅は 580px と だいぶ狭いなと思うので 簡単に変更できるかテストしてみました。
    公開画面と管理画面のCSS と $GLOBALS[‘content_width’] を上書きしてみます。
    */
    
    /*
     * 公開画面での Content幅を 860px へ変更する
     * @since Twenty Twenty 1.0
     * License: GPLv2 or later
     */
    function twentytwenty_org_style() {
        echo '<style>
        .section-inner.thin,
        .entry-content > *:not(.alignwide):not(.alignfull):not(.alignleft):not(.alignright):not(.is-style-wide){
            max-width: 86rem;
        }
        </style>';
    }
    add_action( 'wp_head', 'twentytwenty_org_style', 99 );
     
     
    /*
     * 管理画面での Content幅を 860px へ変更する
     * @since Twenty Twenty 1.0
     * License: GPLv2 or later
     */
    function twentytwenty_admin_style() {
        // Content幅 860 + 30 -> 860 + 0 : Admで確認した画面がUserの画面と異ならないようにした
        echo '<style>
        .wp-block {
            max-width: 860px;
        }
        .wp-block[data-align="wide"] {
            max-width: 860px;;
        }
        .wp-block[data-align="full"] {
            max-width: none;
        }
        </style>';
    }
    add_action( 'admin_print_styles', 'twentytwenty_admin_style', 99 );
     
     
    /*
     * content_width を 860px へ変更する
     * @since Twenty Twenty 1.0
     * License: GPLv2 or later
     */
    function twentytwenty_content_width() {
        // This variable is intended to be overruled from themes.
        $GLOBALS['content_width'] = 860;
    }
    add_action( 'after_setup_theme', 'twentytwenty_content_width', 0 );
    
    // End_01


    // ここまで
    
    
    if ( ! function_exists( 'nendebcom_hide_myplugin_updateplugin' ) ) :
    /*
     * サンプル
     * my-pluginの更新を非表示
     *
     * Note : https://nendeb.com/350
     */
    function nendebcom_hide_myplugin_updateplugin( $data ) {
    	if ( isset( $data->response['my-plugin/my-plugin.php'] ) ) {
    		unset( $data->response['my-plugin/my-plugin.php'] );
    	}
    	return $data;
    }
    add_filter( 'site_option__site_transient_update_plugins', 'nendebcom_hide_myplugin_updateplugin' );
    endif; // nendebcom_hide_myplugin_updateplugin


    if ( ! function_exists( 'nendebcom_plugin_last_load' ) ) :
    /*
     * サンプル
     * my-plugin を最後に読み込むようにする。
     * Note : https://nendeb.com/10
    */
    function nendebcom_plugin_last_load() {
    
        $this_activeplugin  = '';
        $this_plugin        = 'my-plugin/my-plugin.php';    //最後に読み込みたいプラグイン
        $active_plugins     = get_option( 'active_plugins' );
        $new_active_plugins = array();
    
        foreach ( $active_plugins as $plugins ) {
            if( $plugins != $this_plugin ){
                $new_active_plugins[] = $plugins;
            }else{
                $this_activeplugin = $this_plugin;
            }
        }
    
        if( $this_activeplugin ){
            $new_active_plugins[] = $this_activeplugin;
        }
    
        if( ! empty( $new_active_plugins ) ){
            update_option( 'active_plugins' ,  $new_active_plugins );
        }
    }
    add_action( 'activated_plugin', 'nendebcom_plugin_last_load' );
    endif; // nendebcom_plugin_last_load
    

    子テーマのfunctions.phpをいじる

    子テーマの作り方は、以下の関連記事をご参照ください。

    子テーマのディレクトリ直下にある「functions.php」に以下のコードを挿入します。

    functions.php

    • 子テーマ定義
    • 自動保存無効化
    • Headに(adsense)組み込み
      • AMP対応したページ/投稿には、headerにJavaScriptコードは使えません。挿入しても無効化されます。
    <?php
    add_action( 'wp_enqueue_scripts', 'theme_enqueue_styles' );
    function theme_enqueue_styles() {
      wp_enqueue_style( 'parent-style', get_template_directory_uri() . '/style.css' );
      wp_enqueue_style( 'child-style', get_stylesheet_directory_uri() . '/style.css', array('parent-style')
      );
    }
    
    // 自動保存を無効にする処理
    function autosave_off() {
      wp_deregister_script('autosave');
    }
    add_action( 'wp_print_scripts', 'autosave_off' );
    // For no support to AMP, AMP do not allow insertion to Header
    // 以下は、<Head>と</head>の間にGoogle Adsenseコードを挿入
    // ただし、AMPでは、無秩序に挿入は許されないため、AMPを使用する場合は削除
    function km_script () {
     echo '<div><script data-ad-client="ca-pub-1277399675163968" async src="https://pagead2.googlesyndication.com/pagead/js/adsbygoogle.js"></script></div>';
    }
    add_action( 'amp_post_template_head', 'km_script' );
    //
    
    ?>

    ログインしているときに処理する

    編集の最中に、投稿内容をブラウザで表示させて確認する場合、「編集」リンクを投稿の最初や最後の方に表示できると便利です。以下は、投稿の最初に表示させるカスタマイズです。同時に前後の投稿ナビゲーションも表示させます。

    content.phpに、以下のコードを挿入します。

    <?php if (is_user_logged_in()) : ?>
    
    	<div>
    	<?php
    	if ( is_single() ) {
    	
    		get_template_part( 'template-parts/navigation' );
    			
    	}
    
    		// 編集
    		edit_post_link();
    
    	?>
    	</div>
    
    <?php endif;?>
    

    完成した – content.php

    • 前後の投稿へのナビゲータ
    • 投稿の編集リンクの表示

    以下、完成した content.phpのコード

    <?php
    /**
     * The default template for displaying content
     *
     * Used for both singular and index.
     *
     * @link https://developer.wordpress.org/themes/basics/template-hierarchy/
     *
     * @package WordPress
     * @subpackage Twenty_Twenty
     * @since 1.0.0
     */
    
    ?>
    
    <article <?php post_class(); ?> id="post-<?php the_ID(); ?>">
    
    	<?php
    
    	get_template_part( 'template-parts/entry-header' );
    
    	if ( ! is_search() ) {
    		get_template_part( 'template-parts/featured-image' );
    	}
    
    	?>
    
    	<div>
    	<?php 
    	// 全ページに表示 : カテゴリメニュー
    	get_template_part( 'template-parts/info-course' );  
    	?>
    	</div>
    
    <?php if (is_user_logged_in()) : ?>
    
    	<div>
    	<?php
    	if ( is_single() ) {
    	
    		get_template_part( 'template-parts/navigation' );
    			
    	}
    
    		// 編集
    		edit_post_link();
    
    	?>
    	</div>
    
    <?php endif;?>


    	<div class="post-inner <?php echo is_page_template( 'templates/template-full-width.php' ) ? '' : 'thin'; ?> ">
    
    		<div class="entry-content">
    
    			<?php
    			if ( is_search() || ! is_singular() && 'summary' === get_theme_mod( 'blog_content', 'full' ) ) {
    				the_excerpt();
    			} else {
    				the_content( __( 'Continue reading', 'twentytwenty' ) );
    			}
    			?>
    
    		</div><!-- .entry-content -->
    
    	</div><!-- .post-inner -->
    
    	<div class="section-inner">
    		<?php
    		wp_link_pages(
    			array(
    				'before'      => '<nav class="post-nav-links bg-light-background" aria-label="' . esc_attr__( 'Page', 'twentytwenty' ) . '"><span class="label">' . __( 'Pages:', 'twentytwenty' ) . '</span>',
    				'after'       => '</nav>',
    				'link_before' => '<span class="page-number">',
    				'link_after'  => '</span>',
    			)
    		);
    
    		// 編集
    		edit_post_link();
    
    		// Single bottom post meta.
    		twentytwenty_the_post_meta( get_the_ID(), 'single-bottom' );
    
    		if ( is_single() ) {
    
    			get_template_part( 'template-parts/entry-author-bio' );
    
    		}
    		?>
    
    	</div><!-- .section-inner -->
    
    	<div>
    	<?php
    	?>
    	</div>
    
    	<?php
    
    	// 全ページに表示 : カテゴリメニュー
    	get_template_part( 'template-parts/info-course-end' );
    
    	if ( is_single() ) {
    
    		get_template_part( 'template-parts/navigation' );
    
    	}
    
    	/**
    	 *  Output comments wrapper if it's a post, or if comments are open,
    	 * or if there's a comment number – and check for password.
    	 * */
    	if ( ( is_single() || is_page() ) && ( comments_open() || get_comments_number() ) && ! post_password_required() ) {
    		?>
    
    		<div class="comments-wrapper section-inner">
    
    			<?php comments_template(); ?>
    
    		</div><!-- .comments-wrapper -->
    
    		<?php
    	}
    	?>
    
    </article><!-- .post -->
    

    Font-weight

    font-weightの値は、100から900まで100刻み(未確認、1刻みでも可能かもしれない)で設定できます。

    • 400 : 普通の太さ
    • 700 : bold
    • 普通文字を500すれば、見やすくななる(ブロガーさんの提案)

    https://masaa.net/2018/12/28/post-181227-4/

    編集履歴

    2020/04/08 文言整備、ソース記載、タイトル修正
    2020/05/01 文言整備
    2021/02/25 追記 (「はじめに」)

    関連記事(WordPress, Tag:customize)

  • [WordPress] author-bio の幅設定 – CSS for TwentyTwenty [工事中] 2020/02/26]

    [WordPress] author-bio の幅設定 – CSS for TwentyTwenty [工事中] 2020/02/26]

    CSSで表示の体裁をカスタマイズする

    以下の記事の内容は、不十分です。

    authorの表示幅の調整

    以下のコードは、content-widthを860に設定していることを前提にしています。

    Mobileは画面が小さいので、100%表示になっているはずですが、TabletやPCでは、幅が大きいので100%表示にしますが、見にくくなるため、通常1280pxある幅を860pxにして、画面幅をめいいっぱい使用した表示にならないように設定しています。

    以上の理由付は、とりあえずしているものの、完全に理解した上での設定値ではありません。

    設定を変更する場合は、バックアップをとってから行ってください。

    /* author-bio width for my_plugin*/
    .author-bio {
        width: 100%;
        margin: 0 auto;
        max-width: 860px;
    }
    

    関連記事

    Post Views: 288 はじめに サイトの表示具合は、設定されているCSSを変更して自分好みに変更したり、自作のプラグインにCSSコードを埋め込んだり、色々と方法があるようです。CSSをいじる場合は、小テーマを作…
    Post Views: 191 CSSで表示の体裁をカスタマイズする 以下の記事の内容は、不十分です。 authorの表示幅の調整 以下のコードは、content-widthを860に設定していることを前提にしています。…
    Post Views: 216 親テーマと子テーマ いつまで続くか分からない当サイトの構築ですが、プラグインやphpファイルの変更など、他のblogerさんの記事を参考にさせてもらっていいます。 今回は、WordPres…
  • [WorPress] dashicons.min.css、headerからfooterに移動してページ速度改善を模索する

    [WorPress] dashicons.min.css、headerからfooterに移動してページ速度改善を模索する

    dashicons.mini.cssについて

    WordPressのメニューに使用するアイコンのcssファイル (dashicons.min.css)は、headerに位置されていますが、Google PageSpeed Insightsのテストでは、スコアを重くする原因の一つです。

    このスコアの改善をしたくてググっていると、スコア改善のために、dashicons.min.cssをfooterに移動させたと考えているユーザーがいました。

    以下のリンクページで、そのコードがアップされていたので、function.phpにコピペして試してみました。その結果、footerへの移動もできていないようで、数値も殆ど変わりませんでした。

    作業記録としてここに、コードを残します。

    コード

    今後、このあたりの検討をする場合に、参考にしたいためです。

    
    Final working solution was:
    
    add_action( 'wp_print_styles', 'my_deregister_styles' );
    function my_deregister_styles()    { 
       wp_deregister_style( 'dashicons' ); 
    }
    
    add_action( 'wp_footer', 'register_wp_footer' );
    function register_wp_footer() { 
        wp_enqueue_style( 'dashicons', '/wp-includes/css/dashicons.min.css');
    }

    jquery.jsについて

    因みに、「jquery.js」は、最初に読み込まれていなればいけないようです。

    わかった事

    • dashicons.min.css: footerに移動してもよい
    • jquery.js: footerに移動してはいけない

    備忘記録 2020/02/14 はりきり(Mr)

    Move dashicons.min.css to Footer

    https://wordpress.stackexchange.com/questions/341675/move-dashicons-min-css-to-footer

    編集履歴

    2020/03/15, MR.HARIKIRI
    2021/10/22, 文言整備

  • [WordPress] テーマ・カスタマイズ – Twenty Seventyテーマの2カラム表示の幅の拡大 [2019/09/03]

    [WordPress] テーマ・カスタマイズ – Twenty Seventyテーマの2カラム表示の幅の拡大 [2019/09/03]

    はじめに

    WordPressでblogを始めた頃は、先人の投稿を参考にしテーマを「Twenty Seventy」にしていました。2020/08現在は、WordPressのバージョンアップととにも搭載されたシングル・カラムであるTwenty Twentyに変更しています。

    以下の記事は、Twenty Seventyの表示の体裁について、CSSもよく分からないまま、先人の知恵をお借りしてなんとか設定していた頃の記録です(2020/08/25, Mr.Harikiri)

    Twenty Seventyテーマの2カラム化

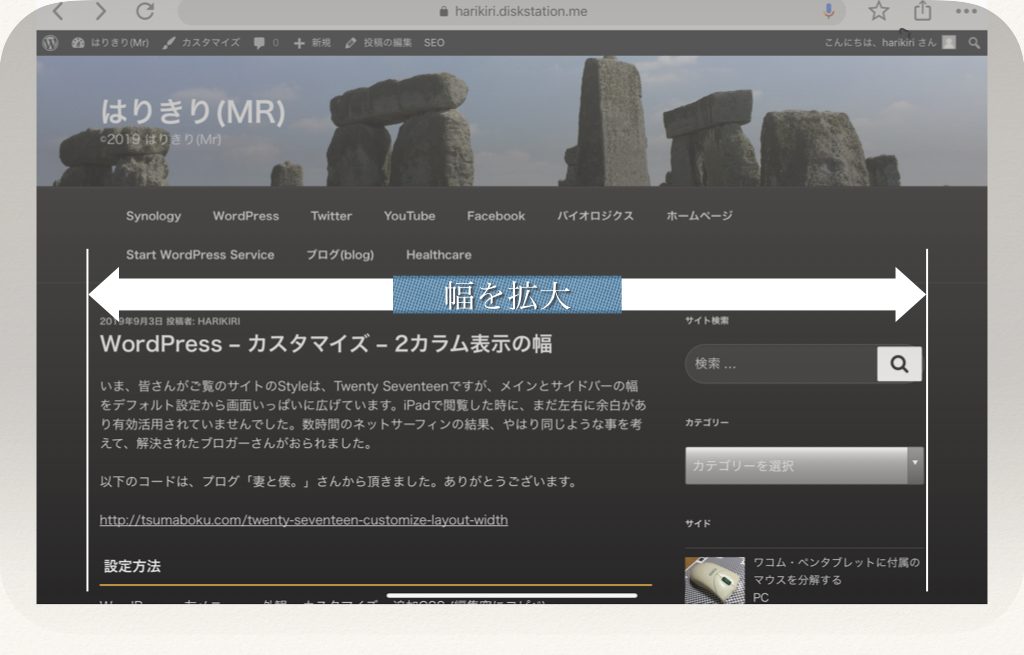
    以前、使っていたサイトのStyleは、「Twenty Seventeen」でしたが、メインとサイドバーの幅をデフォルト設定から画面いっぱいに広げていました。

    WordPress、CSSなど、全く何もわかっていなかった時期でした。

    iPadで閲覧した時に、デフォルトでは、左右に余白があり有効活用されていませんでしたので、スペースの有効活用の情報収集として、数時間のネットサーフィンの結果、やはり同じような事を考えて、解決されたブロガーさんがおられました。

    以下のコードは、プログ「妻と僕。」さんから頂きました。ありがとうございます。

    設定方法

    WordPress > 左メニュー > 外観 > カスタマイズ > 追加CSS (編集窓にコピペ)
    /*
    * 説明 : widthを効率化する
    */
    @media screen and (min-width: 48em) {
    .wrap {
    max-width: 1100px;/*記事・サイドバー・余白の全幅*/
    padding-left: 2em;/*記事の左余白*/
    padding-right: 2em;/*サイドバーの右余白*/
    }
    .has-sidebar:not(.error404) #primary {
    float: left;
    width: 67%;/*記事幅*/
    }
    .has-sidebar #secondary {
    float: right;
    padding-top: 0;
    width: 29%;/*サイドバー幅*/
    }
    .navigation-top .wrap {
    max-width: 1100px;/*メニューバー幅*/
    padding: 0.75em 3.4166666666667em;
    }
    .site-content {
    padding: 2.5em 0 0;/*メニューバーと記事の間隔*/
    }
    }
    編集履歴
    2019/09/03 Mr.はりきり
    2020/07/28 修正(過去の状況であることを明確に記述)